Maven
任务
1. Maven安装
2. Maven环境变量配置
3. 在Eclipse中配置Maven
4. 在Idea中配置Maven
5. 创建Maven项目
6. Maven传递依赖
7. Maven继承
8. Maven聚合
目标
1. 掌握Maven安装
2. 掌握Maven环境变量配置
3. 掌握在Eclipse中配置Maven
4. 掌握在Idea中配置Maven
5. 掌握创建Maven项目
6. 掌握Maven传递依赖
7. 掌握Maven继承
8. 掌握Maven聚合
官网地址:
第一章 Maven简介
1.1 简介
xxxxxxxxxx Maven是一个基于项目对象模型(POM)的概念的纯java开发的开源的项目管理工具。主要用来管理java项目,进行依赖管理(jar包管理,能自动分析项目所需的依赖软件包,并到Maven仓库区下载)和项目构建(项目打包和部署)。此外还能分块开发,提高开发效率。1.2 Maven目标
xxxxxxxxxxMaven主要目标是提供给开发人员: 1. 项目是可重复使用,易维护,更容易理解的一个综合模型。 2. 插件或交互的工具,这种声明性的模式。第二章 Maven安装
2.1 下载Maven库
x下载地址:http://maven.apache.org/download.cgi备注:Maven 3.3+ require JDK 1.7 or above to execute 2.2 解压下载库认识Maven库目录
xxxxxxxxxx备注: 解压文件尽量不要放在含有中文或者特殊字符的目录下。 bin:含有mvn运行的脚本 boot:含有plexus-classworlds类加载器框架 conf:含有settings.xml配置文件 lib:含有Maven运行时所需要的java类库 LICENSE.txt, NOTICE.txt, README.txt针对Maven版本,第三方软件等简要介绍2.3 配置Maven环境变量
    1.右键我的电脑(或者计算机)-属性-高级系统设置-高级-环境变量-系统变量-新建MAVEN_HOME,只为maven的安装目录
    2.把%MAVEN_HOME%\bin;追加到Path变量的值后面
    3.检验是否成功:cmd-> mvn -v
    4.修改配置文件:maven安装目录下conf目录中settings.xml
2.3.1 Eclipse配置Maven
方法1:直接使用自带插件
xxxxxxxxxx1、在 用户目录/.m2 文件夹下 创建 settings.xml 文件,配置maven仓库的位置2、在eclipse中配置maven的用户配置文件路径,具体如下图所示: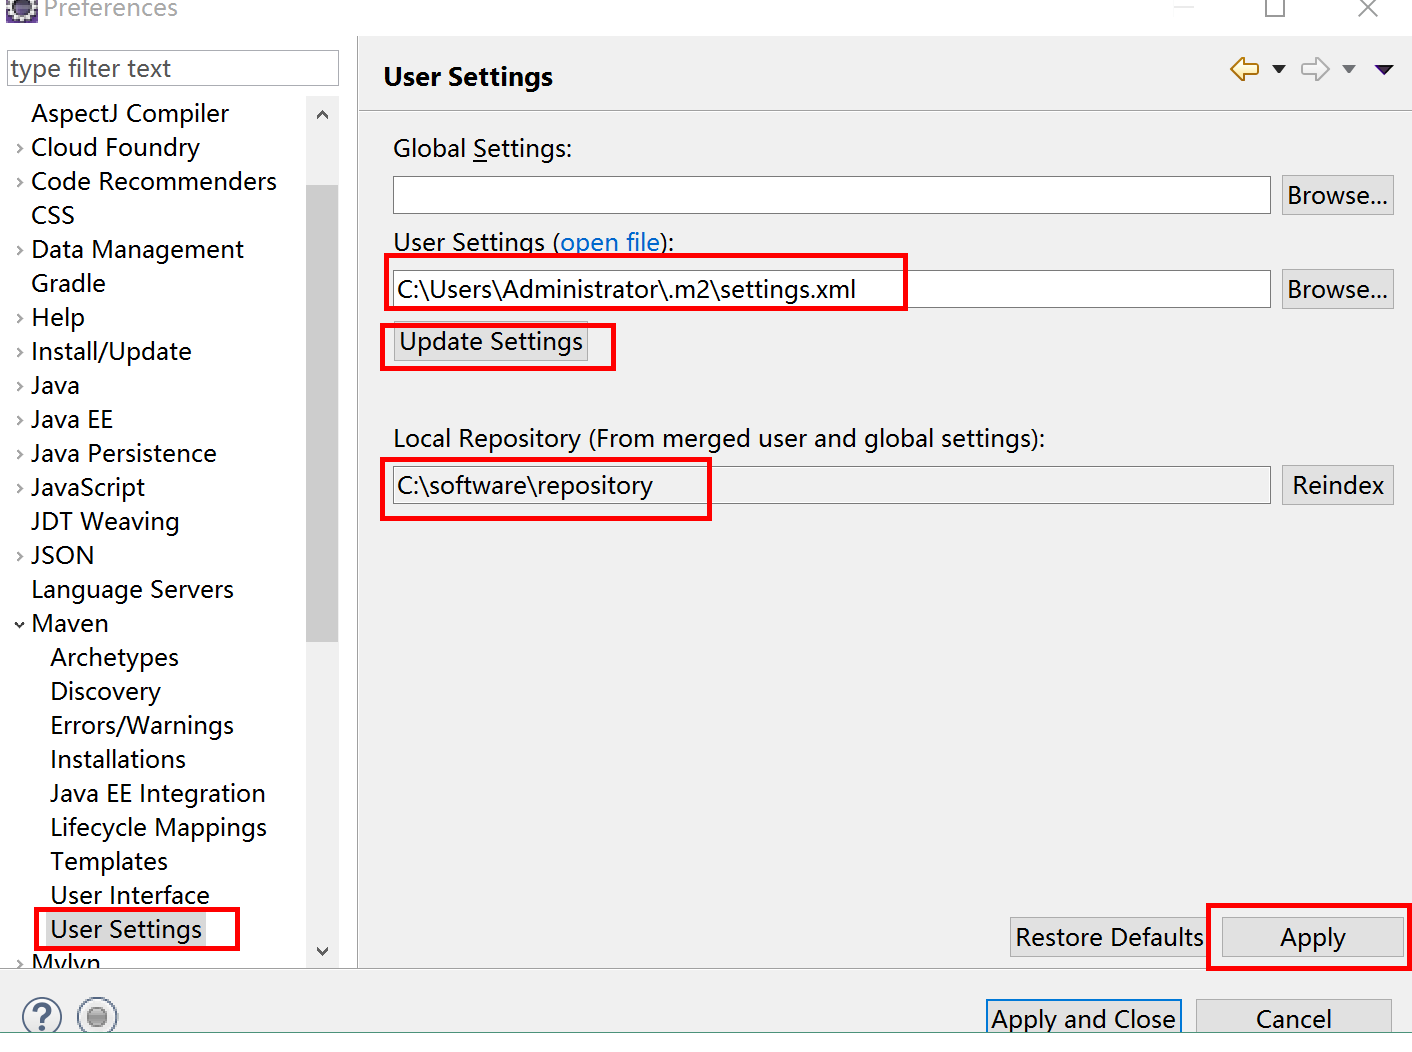
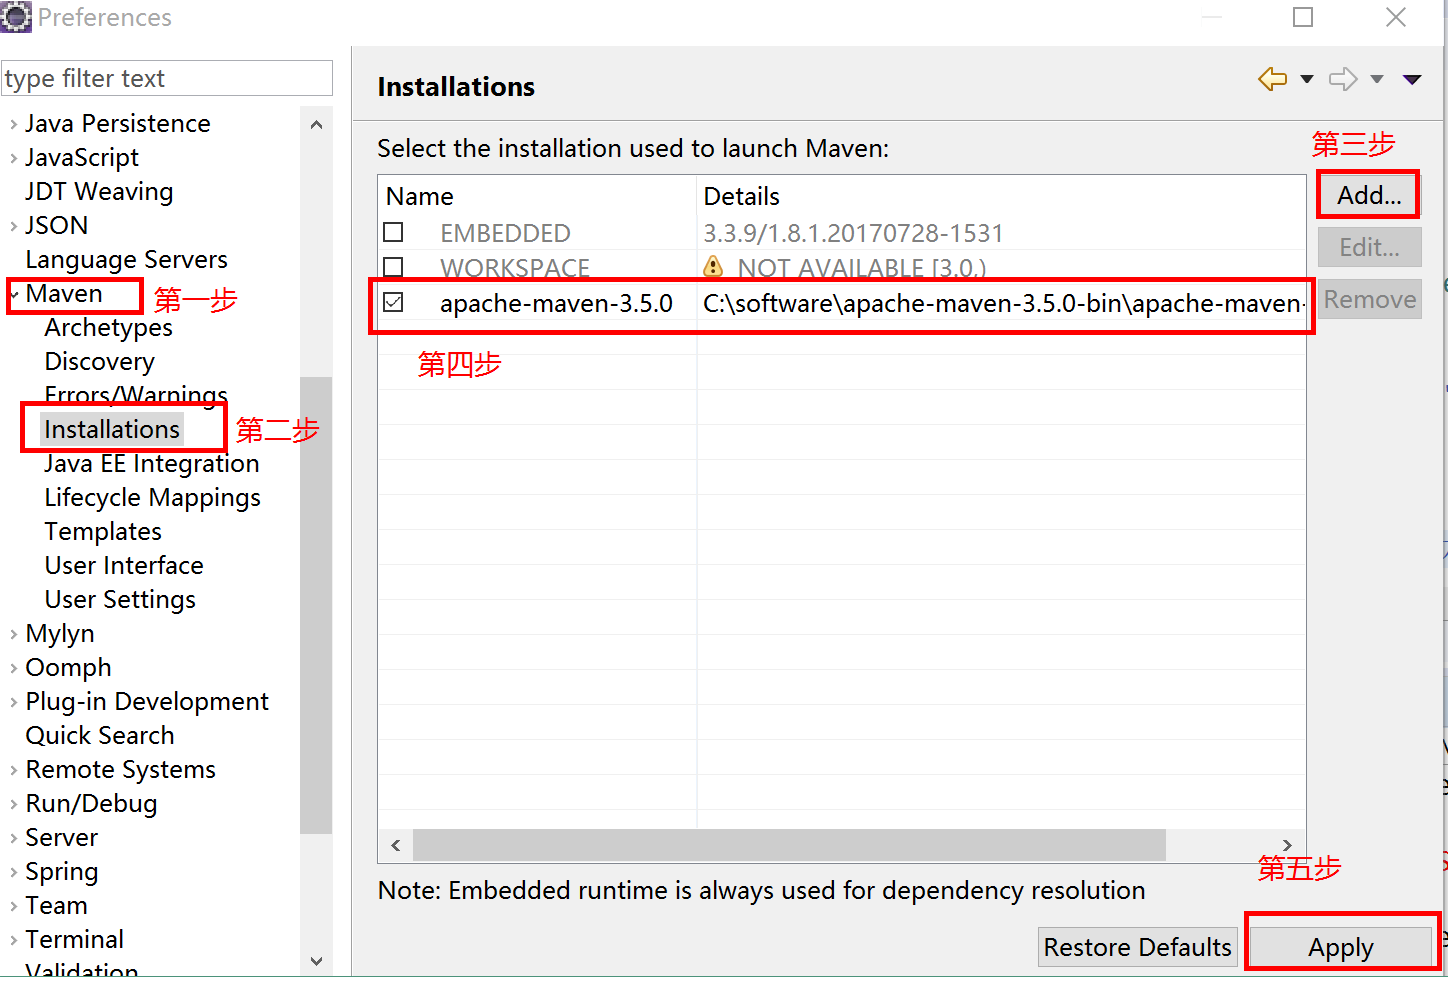
方法2: 使用自己的maven文件
1. 首先使用自己的Maven安装文件替换掉Eclipse插件的Maven,如下图:
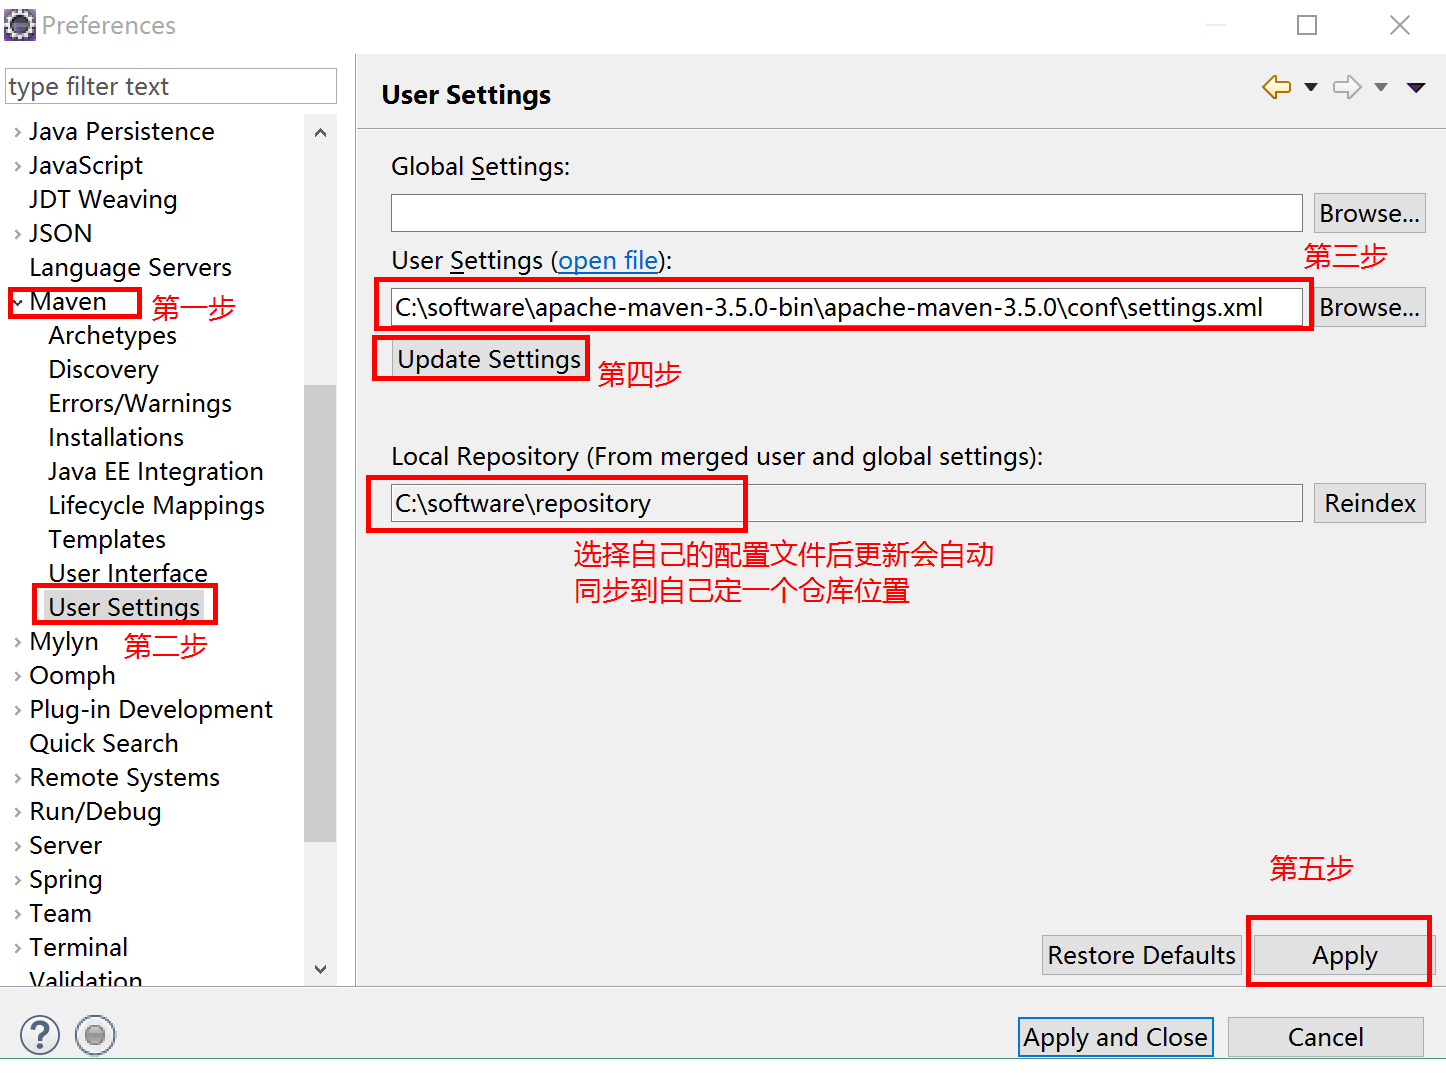
2.配置用户自己maven的配置文件
2.3.2 Idea配置Maven
使用的idea工具,在Settings-maven中修改:
如下图:

2.4 Maven配置文件(settings.xml)具体说明
xxxxxxxxxx 1.localRepository:设置本地仓库:<localRepository>C:\software\repository</localRepository> 2.pluginGroups:插件组合 3.proxies:代理 4.servers服务器(其中username和password是私服的用户名和密码,后续配置私服说明) <server> <id>user-releases</id> <username>admin</username> <password>wangwujuan</password> </server> <server> <id>user-snapshots</id> <username>admin</username> <password>wangwujuan</password> </server> 5.mirrors:镜像路径 <!-- 阿里镜像 --> <mirror> <id>alimaven</id> <name>aliyun maven</name> <url>http://maven.aliyun.com/nexus/content/groups/public/</url> <mirrorOf>central</mirrorOf> </mirror> 6.profiles:服务器配置 <!--服务器的配置--> <profile> <id>nexusProfile</id> <repositories> <repository> <id>nexus</id> <name>nexus</name> <url>http://localhost:8081/nexus/content/groups/public/</url> <releases> <enabled>true</enabled> </releases> <snapshots> <enabled>true</enabled> </snapshots> </repository> </repositories> <pluginRepositories> <!-- 插件仓库,maven的运行依赖插件,也需要从私服下载插件 --> <pluginRepository> <!-- 插件仓库的id不允许重复,如果重复后边配置会覆盖前边 --> <id>public</id> <name>Public Repositories</name> <url>http://localhost:8081/nexus/content/groups/public/</url> </pluginRepository> </pluginRepositories> </profile> <!-- java编译插件,配jdk的编译版本--> <profile> <id>jdk-1.8</id> <activation> <activeByDefault>true</activeByDefault> <jdk>1.8</jdk> </activation> <properties> <maven.compiler.source>1.8</maven.compiler.source> <maven.compiler.target>1.8</maven.compiler.target> <maven.compiler.compilerVersion>1.8</maven.compiler.compilerVersion> </properties> </profile> 7.activeProfiles:激活私服 <activeProfiles> <activeProfile>nexusProfile</activeProfile> </activeProfiles>2.5 Maven仓库说明
存储jar的仓库(3种仓库)
xxxxxxxxxx1.本地仓库:存储在本地磁盘,默认在系统盘c盘 用户名/.m2/xx 通过settings.xml 更改本地仓库localRepository2.远程仓库:一般都使用国内镜像或者公司自己搭建私服. 一般用Nexus 目的:加快下载速度 私服存在的意义:开发者电脑更新,本地仓库就有jar。目前常用的就是阿里镜像3.Maven(中央)仓库:Maven团队维护的jar包仓库 http://repo1.maven.org/maven2/ 一般用这个查POM:http://mvnrepository.com/ 检索顺序:先检索本地仓库--再检索远程仓库--最后检索中央仓库 具体可看下图示例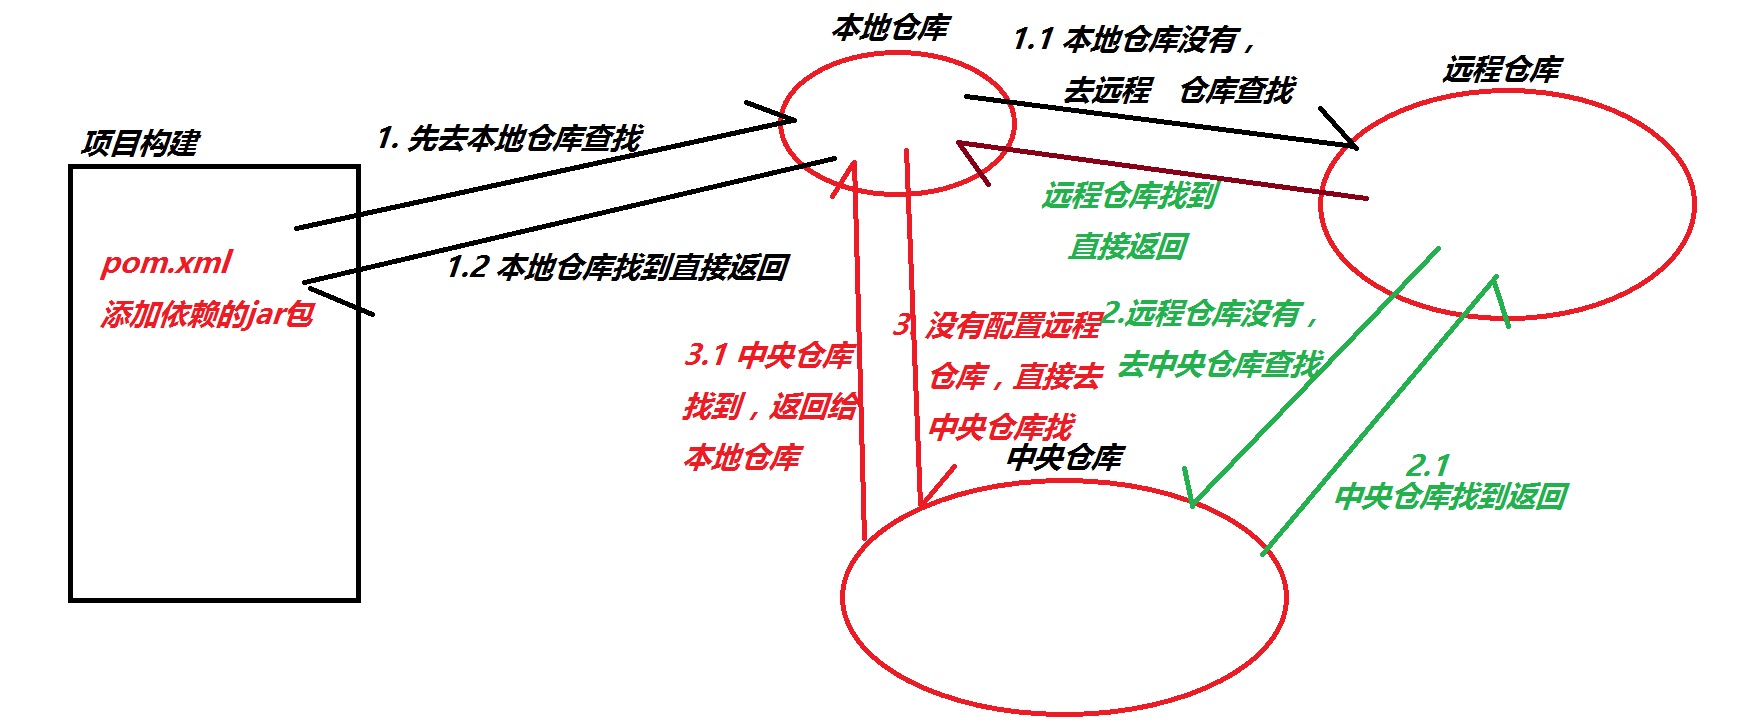
2.6 Maven管理项目周期
1. Clean:项目构建前的清理操作
2. Default: 核心生命周期核心过程:编译,运行,打包等等
3. Site:发布站点,生成报告等等,
第三章 创建Maven项目
3.1 Eclipse创建Maven工程
xxxxxxxxxxNew ——Maven Project ——选择create a Simple Project(跳过模版)-- 填写工程信息--完成即可 备注:工程创建完成后有错误,缺少web.xml文件,右键项目-JavaEE Tools-Generate Deployment Discriptor Stub即可生成web.xml文件。填写的工程信息如下图: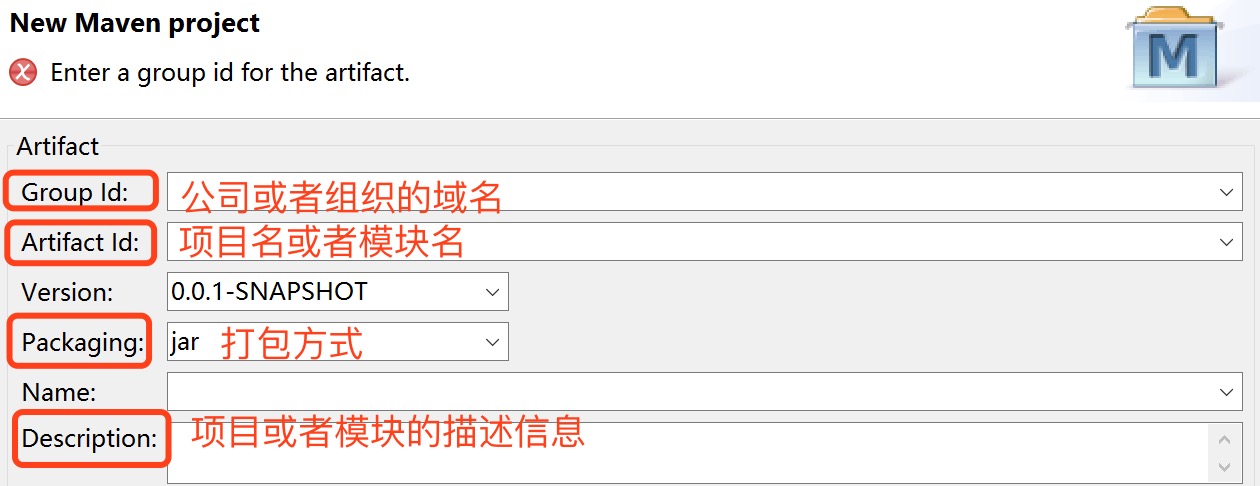
3.2 Maven项目说明
      src/main/java:存放项目的.java文件
      src/main/resources:存放项目资源文件。如何Spring,Hibernate配置文件
      src/test/java:存放所有测试的.java文件.如Junit测试类
      src/test/resources:测试资源文件
      target:项目数出位置(可以自动生成)
      pom.xml(maven项目核心配置文件)

 pom.xml默认内容介绍:
        <!-- maven中model的版本号 -->
        <modelVersion>4.0.0</modelVersion>
        <!-- 公司名称或组织名称或者个人名称 -->
        <groupId>com.sky</groupId>
        <!--项目名称 -->
        <artifactId>FirstMaven</artifactId>
        <!-- 版本号  -->
        <version>1.0</version>
        <!-- 打包方式 :项目类型
        POM:MAVEN项目,常用在继承和聚合上
        JAR:JAVASE项目,没有网页,跟服务器没关系
        WAR:JAVAEE项目,跟服务器没关系-->
        <packaging>war</packaging>
3.3 Maven工程添加依赖
xxxxxxxxxx上网搜索依赖进行添加: 推荐网站:http://mvnrepository.com/示例:<dependencies> <!-- https://mvnrepository.com/artifact/org.hibernate/hibernate-core --> <dependency> <groupId>org.hibernate</groupId> <artifactId>hibernate-core</artifactId> <version>5.2.10.Final</version> </dependency></dependencies> 添加到项目的pom文件内容说明(切换pom.xml到Dependencies目录下): type:类型 取值说明: jar:jar包 Scope:声明jar包的存活时间 取值说明: 1、provided:编译和测试时需要 2、compile:编译、测试、运行、打包需要 3、runtime:测试、运行、打包需要 4、test:测试 5、system:编译和测试时需要,显示引用,Maven不会检索3.4 修改maven工程的jdk版本号(两种方式)
xxxxxxxxxx方式一:在指定项目的pom.xml中添加如下话语(每个maven project或者maven model都要配置):<!--构建项目配置 --> <build> <!--插件 --> <plugins> <!-- java编译插件,配jdk的编译版本 --> <plugin> <groupId>org.apache.maven.plugins</groupId> <artifactId>maven-compiler-plugin</artifactId> <version>3.6.0</version> <configuration> <source>1.8</source> <target>1.8</target> <encoding>UTF-8</encoding> </configuration> </plugin> </plugins> </build>方式二:在maven的settings.xml中配置jdk插件(配置一次即可):放在<profiles>节点下即可 <profile> <id>jdk-1.8</id> <activation> <activeByDefault>true</activeByDefault> <jdk>1.8</jdk> </activation> <properties> <maven.compiler.source>1.8</maven.compiler.source> <maven.compiler.target>1.8</maven.compiler.target> <maven.compiler.compilerVersion>1.8</maven.compiler.compilerVersion> </properties> </profile> 第四章 Maven依赖传递
1.什么是传递依赖?
依赖一个jar包往往会下载相互关联的jar包这就是依赖传递
2.依赖传递出现的问题
依赖传递出现的问题: 经常出现jar包冲突,
            解决方案:直接排除指定的jar包
3.解决jar包冲突的方式(4种)
3.1 排除原则(常用)
xxxxxxxxxx<exclusions> <exclusion> <groupId>org.springframework</groupId> <artifactId>spring-core</artifactId> </exclusion></exclusions>3.2 版本号限定原则
xxxxxxxxxx<!-- 1.标记版本号 --><properties> <spring.version>4.3.8.RELEASE</spring.version></properties> <!-- 2. 锁定版本,spring4.3.8 --> <dependencyManagement> <dependencies> <dependency> <groupId>org.springframework</groupId> <artifactId>spring-context</artifactId> <version>${spring.version}</version> </dependency> </dependencies> </dependencyManagement> <!-- 依赖管理 --> <dependencies> <!-- spring --> <dependency> <groupId>org.springframework</groupId> <artifactId>spring-context</artifactId> </dependency> </dependencies>3.3 第一声明原则(基本不用)
3.4 路径就近原则(基本不用)
4 依赖传递中的依赖范围
5.Maven常用命令
clean:清空
compile:编译
deploy:上传
test:单元测试
install:添加到本地仓库
tomcat:run 启动tomcat
package:打包
第五章 Maven继承
    开发中多个项目有共同的jar包依赖,可以采用继承方式简化各个项目的pom文件,在父类的pom文件中依赖共同拥有的jar.
   注意:
       1.父级项目只能是pom打包方式。
       2.子项目是一个Maven Project

   示例: 创建一个pom项目,然后再创建另外的jar或war项目继承pom项目
第六章 Maven聚合
1.什么是聚合?
   能够把项目的各个模块聚合在一起构建。一般用于分模块开发,最后整体打包发布。

     Maven Model和Maven Project的区别?
          Maven Project独立运行
          Maven Model无法独立运行
   注意:
       1.根项目是一个pom项目。
       2.子模块:Maven Model
       3.每个模块写完后需要上传到私服
       4.打包,需要整体打包找到最后的war项目使用Tomcat加载

        实际中,我们会将一些庞大的项目拆分为若干模块进行开发
        三层+MVC 如下:
        domain-------jar
        dao----------jar
        service------jar
        web----------war
2.私服搭建(看图文教程)
3.Maven聚合具体操作
1. 创建一个总项目,然后再当前项目中创建Maven Model项目2. 上传jar包到服务器(如果上述setting.xml文件中配置过再次检查是否配置完整正确): 第一步:配置私服地址 1. 在settings.xml添加: <server> <id>user-releases</id> <username>admin</username> <password>wangwujuan</password> </server> <server> <id>user-snapshots</id> <username>admin</username> <password>wangwujuan</password> </server> 2.在当前项目的pom.xml文件添加: <!-- 配置远程发布到私服,mvn deploy --> <distributionManagement> <repository> <id>user-releases</id> <url>http://localhost:8081/nexus/content/repositories/releases/</url> </repository> <snapshotRepository> <id>user-snapshots</id> <url>http://localhost:8081/nexus/content/repositories/snapshots/</url> </snapshotRepository> </distributionManagement> 第二步:Run As/Maven Build.../Goals/ 直接输入:deploy 如果所有配置正确,发现上传私服失败,需要进入私服找到指定仓库 Repository--- Access Settings--Deployment Policy修改为允许发布3.从服务器下载jar 1.1、在settings.xml文件中 <profile> <id>nexusProfile</id> <repositories> <repository> <id>nexus</id> <name>nexus</name> <url>http://localhost:8081/nexus/content/groups/public/</url> <releases> <enabled>true</enabled> </releases> <snapshots> <enabled>true</enabled> </snapshots> </repository> </repositories> <pluginRepositories> <!-- 插件仓库,maven的运行依赖插件,也需要从私服下载插件 --> <pluginRepository> <!-- 插件仓库的id不允许重复,如果重复后边配置会覆盖前边 --> <id>public</id> <name>Public Repositories</name> <url>http://localhost:8081/nexus/content/groups/public/</url> </pluginRepository> </pluginRepositories> </profile> 2.激活私服 <!-- 激活 --> <activeProfiles> <activeProfile>nexusProfile</activeProfile> </activeProfiles> 运行项目 1.要整体打包 2.选中当前项目右键-Maven Build.../clean package 找到web项目的war包放到Tomcat目录下 也可以在pom文件中使用Tomcat插件 注意: 私服一般安装在内网的其他服务器上,而不是本机上。因此上面的配置中localhost的部分在实际情况中应该修改为公司中内网的私服服务器地址。第七章 聚合与继承的关系
- 聚合是为了方便快速构件项目。对于聚合模块来说,它知道有哪些被聚合的模块,但那些模块不知道这个聚合模块的存在;
- 继承是为了消除重复配置。对于继承关系的父POM来说,它不知道有哪些子模块继承于它,但是子模块必须知道自己的父POM是什么。
课前默写
1. 使用JSP、Servlet和JDBC完成基础的CRUD操作
作业
1. 在自己的开发工具配置Maven
2. 创建一个pom项目,并创建项目其他层(service、dao、controller等)继承pom项目
3. 在自己的电脑上搭建一个私服,并相互访问对方的私服
面试题
1. Maven工具的作用
2. Maven如何继承,需要注意什么
3. Maven搭建私服的流程