MyBatis-01-mybatis配置文件和简单使用
MyBatis-01-mybatis配置文件和简单使用回顾任务目标一、MyBatis简介1.简介2. 背景介绍3.框架特点4. 总体流程5. 功能架构6. 体系结构7. MyBatis和数据交互的方式7.1 使用传统的MyBatis API7.2 使用Mapper接口8.MyBatis配置文件8.1. 核心配置文件8.2 映射文件二、MyBatis基本应用1、搭建MyBatis技术环境1.1、环境准备1.2、下载MyBatis1.3、数据库准备1.4、数据准备2、获取SqlSession对象3、利用SqlSession实现CRUD操作3.1、新增操作3.2、删除操作3.3、修改操作3.4、查询操作4、利用MyBatis实现分页查询4.1、使用map4.2、使用注解4.3、使用序号5、返回Map类型查询结果5.1、xml文件配置5.2、sql的编写5.3、实现org.apache.ibatis.session 中ResultHandler接口6、使用Mapper映射器6.1、开发规范6.2、编程步骤6.3、程序编写7、ResultMap映射定义7.1、使用方法7.2、需求7.3、Mapper映射文件7.4、Mapper接口定义7.5、测试代码课前默写作业面试题
回顾
1. Controller中向页面传值的几种方式
2. Controller中使用Servlet API
3. RESTful风格编码
4. SpringMVC中处理静态资源
5. SpringMVC中的核心组件
6. SpringMVC中处理JSON
7. SpringMVC中异常处理
8. SpringMVC中拦截器
9. SpringMVC中的文件上传下载
任务
1. MyBatis框架介绍
2. MyBatis的基本数据交互方式
3. MyBatis基础配置
4. MyBatis环境搭建
5. MyBatis的基础CRUD操作
目标
1. 掌握MyBatis框架原理
2. 掌握MyBatis的基本数据交互方式
3. 掌握MyBatis基础配置
4. 掌握MyBatis环境搭建
5. 掌握MyBatis的基础CRUD操作
一、MyBatis简介
MyBatis 本是apache的一个开源项目iBatis, 2010年这个项目由apache software foundation 迁移到了google code,并且改名为MyBatis 。2013年11月迁移到Github。
iBATIS一词来源于“internet”和“abatis”的组合,是一个基于Java的持久层框架。iBATIS提供的持久层框架包括SQL Maps和Data Access Objects(sDAO)
下载地址: MyBatis下载地址
使用版本:3.4.5
1.简介
MyBatis 是一款优秀的持久层框架,它支持定制化 SQL、存储过程以及高级映射。MyBatis 避免了几乎所有的 JDBC 代码和手动设置参数以及获取结果集。MyBatis 可以使用简单的 XML 或注解来配置和映射原生信息,将接口和 Java 的 POJOs(Plain Old Java Objects,普通的 Java对象)映射成数据库中的记录
2. 背景介绍
MyBatis是支持普通SQL查询,存储过程和高级映射的优秀持久层框架。MyBatis消除了几乎所有的JDBC代码和参数的手共设置以及结果集的检索,MyBatis使用简单的XML或者注解用于配置和原始映射,将接口和Java的POJOs(Plain Ordinary Java Objects,普通的 Java对象)映射成数据库中的记录。
每个MyBatis应用程序主要利用SqlSessionFactory实例操作数据库,而SqlSessionFactory实例可以通过SqlSessionFactoryBuilder获得。SqlSessionFactoryBuilder可以从一个xml配置文件或者一个预定义的配置类实例获得。
用xml文件构建SqlSessionFactory实例是非常简单的事情,推荐在这个配置中使用类路径资源(classpath resource),但你可以使用任何Reader实例,包括用文件路径或者f://开头的url创建实例。MyBatis有一个实用类(Resources),它有很多方法,可以方便地从类路径以及其他位置加载资源。
3.框架特点
- 简单易学:本身就很小且简单。没有任何第三方依赖,最简单安装只要两个jar文件+配置几个sql映射文件易于学习,易于使用,通过文档和源代码,可以比较完全的掌握它的设计思路和实现。
- 灵活:mybatis不会对应用程序或者数据库的现有设计强加任何影响。 sql写在xml里,便于统一管理和优化。通过sql基本上可以实现我们不使用数据访问框架可以实现的所有功能,或许更多。
- 解除sql与程序代码的耦合:通过提供DAL层,将业务逻辑和数据访问逻辑分离,使系统的设计更清晰,更易维护,更易单元测试。sql和代码的分离,提高了可维护性。
- 提供映射标签,支持对象与数据库的orm字段关系映射
- 提供对象关系映射标签,支持对象关系组建维护
- 提供xml标签,支持编写动态sql
4. 总体流程
- 加载配置并初始化
触发条件:加载配置文件
处理过程:将SQL的配置信息加载成为一个个MappedStatement对象(包括了传入参数映射配置、执行的SQL语句、结果映射配置),存储在内存中。
- 接收调用请求
触发条件:调用Mybatis提供的API
传入参数:为SQL的ID和传入参数对象
处理过程:将请求传递给下层的请求处理层进行处理。
- 处理操作请求
触发条件:API接口层传递请求过来
传入参数:为SQL的ID和传入参数对象
处理过程:
(A)根据SQL的ID查找对应的MappedStatement对象。
(B)根据传入参数对象解析MappedStatement对象,得到最终要执行的SQL和执行传入参数。
(C)获取数据库连接,根据得到的最终SQL语句和执行传入参数到数据库执行,并得到执行结果。
(D)根据MappedStatement对象中的结果映射配置对得到的执行结果进行转换处理,并得到最终的处理结果。
(E)释放连接资源。
- 返回处理结果将最终的处理结果返回
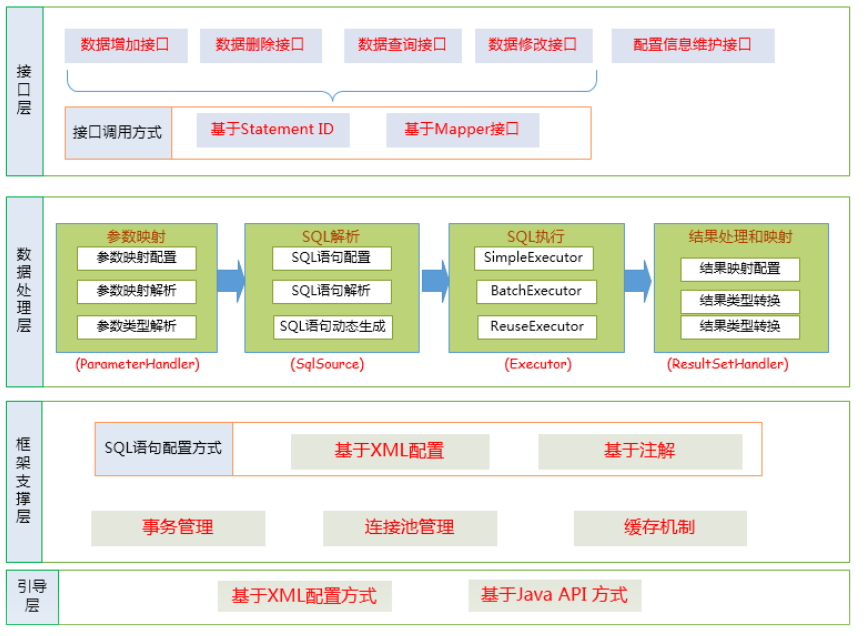
5. 功能架构
Mybatis的功能架构分为三层:
API接口层:提供给外部使用的接口API,开发人员通过这些本地API来操纵数据库。接口层一接收到调用请求就会调用数据处理层来完成具体的数据处理。
数据处理层:负责具体的SQL查找、SQL解析、SQL执行和执行结果映射处理等。它主要的目的是根据调用的请求完成一次数据库操作。
基础支撑层:负责最基础的功能支撑,包括连接管理、事务管理、配置加载和缓存处理,这些都是共用的东西,将他们抽取出来作为最基础的组件。为上层的数据处理层提供最基础的支撑。

6. 体系结构

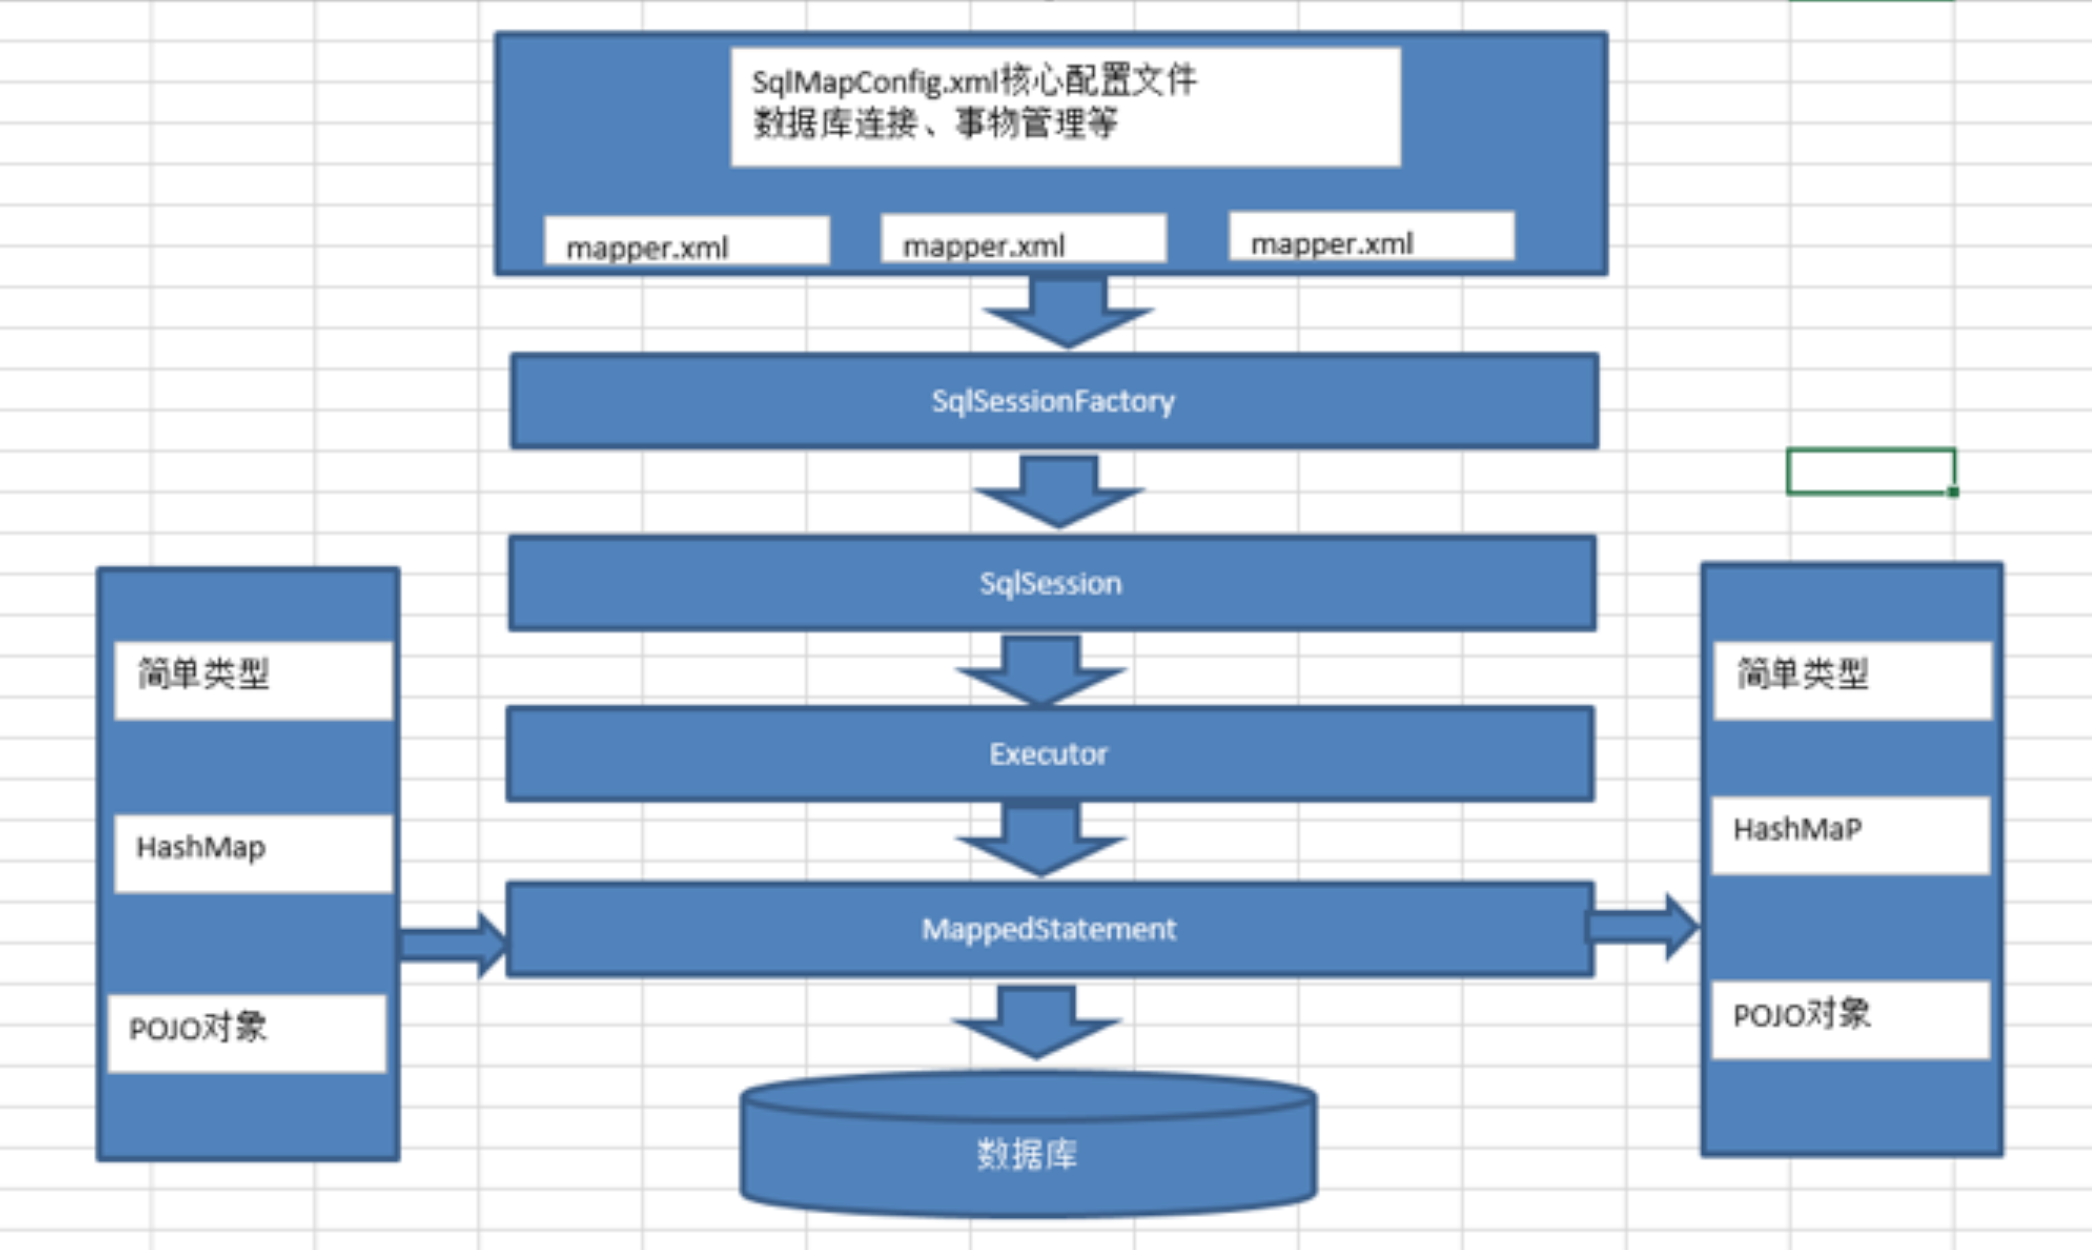
mybatis配置文件,包括Mybatis全局配置文件和Mybatis映射文件,其中全局配置文件配置了数据源、事务等信息;映射文件配置了SQL执行相关的 信息。
- mybatis通过读取配置文件信息(全局配置文件和映射文件),构造出SqlSessionFactory,即会话工厂。
- 通过SqlSessionFactory,可以创建SqlSession即会话。Mybatis是通过SqlSession来操作数据库的。
- SqlSession本身不能直接操作数据库,它是通过底层的Executor执行器接口来操作数据库的。Executor接口有两个实现类,一个是普通执行器,一个是缓存执行器(默认)。
- Executor执行器要处理的SQL信息是封装到一个底层对象MappedStatement中。该对象包括:SQL语句、输入参数映射信息、输出结果集映射信息。其中输入参数和输出结果的映射类型包括java的简单类型、HashMap集合对象、POJO对象类型。
7. MyBatis和数据交互的方式
MyBatis和数据库交互方式主要分两种:
- 使用传统的MyBatis提供的API;
- 使用Mapper接口;
7.1 使用传统的MyBatis API
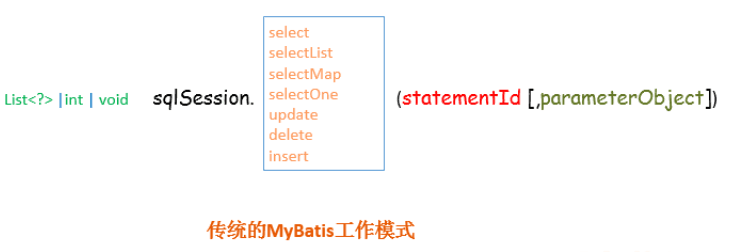
通过调用MyBatis中SqlSession对象的方法从而达到与数据库交互的方式,有一些类似DBUtils的操作!

上述使用MyBatis的方法,是创建一个和数据库打交道的SqlSession对象,然后根据Statement Id 和参数来操作数据库,这种方式固然很简单和实用,但是它不符合面向对象语言的概念和面向接口编程的编程习惯。由于面向接口的编程是面向对象的大趋势,MyBatis为了适应这一趋势,增加了第二种使用MyBatis 支持接口(Interface)调用方式。
7.2 使用Mapper接口
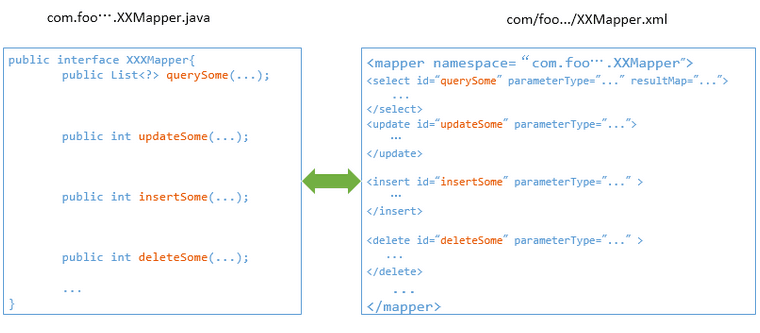
MyBatis将核心配置文件中的每一个

根据MyBatis的配置规范配置好后,通过SqlSession.getMapper(XXXMapper.class) 方法,MyBatis会根据相应的接口声明的方法信息,通过动态代理机制生成一个Mapper实例,我们使用Mapper接口的某一个方法时,MyBatis会根据这个方法的方法名和参数类型,确定Statement Id,底层还是通过SqlSession.select("statementId",parameterObject);或者SqlSession.update("statementId",parameterObject);等等来实现对数据库的操作,
MyBatis引用Mapper接口这种调用方式,纯粹是为了满足面向接口编程的需要。(其实还有一个原因是在于,面向接口的编程,使得用户在接口上可以使用注解来配置SQL语句,这样就可以脱离XML配置文件,实现“0配置”)
8.MyBatis配置文件
8.1. 核心配置文件
在classpath下,创建SqlMapConfig.xml文件,该文件为核心配置文件,可以配置当前环境信息,加载映射文件,加载properties文件,配置全局参数,定义别名等。
x <configuration> <!-- 加载properties文件 先加载property子标签的内容,后加载properties文件 如果名称相同,后边覆盖前边内容 --> <properties resource="jdbc.properties"> <property name="jdbc.password" value="12345"/> </properties> <!-- 全局参数配置:二级缓存,延迟加载 <settings></settings> --> <!-- 定义别名 --> <typeAliases> <!-- 给单个的类起别名 <typeAlias type="com.qf.domain.User" alias="user"/> --> <!-- 给指定包下的类起别名 别名的定义规则:类名首字母小写 --> <package name="com.qf.domain"/> </typeAliases> <!-- 配置mybatis的环境信息 --> <environments default="development"> <environment id="development"> <!-- 配置JDBC事务控制,由mybatis进行管理 --> <transactionManager type="JDBC"></transactionManager> <!-- 配置数据源,采用mybatis连接池 --> <dataSource type="POOLED"> <property name="driver" value="${jdbc.driver}" /> <property name="url" value="${jdbc.url}" /> <property name="username" value="${jdbc.username}" /> <property name="password" value="${jdbc.password}" /> </dataSource> </environment> </environments> <!-- 加载映射文件 --> <mappers> <!-- 使用资源的路径 --> <mapper resource="User.xml"/> <!-- <mapper resource="com/qf/mapper/UserMapper.xml"/> --> <!-- 使用资源的绝对路径 <mapper url=""/> --> <!-- Mapper接口的全类名 要求:Mapper接口的名称与映射文件名称一致 必须在同一个目录下 <mapper class="com.qf.mapper.UserMapper"/> --> <!-- 加载某个包下的映射文件 (推荐) 要求:Mapper接口的名称与映射文件名称一致 必须在同一个目录下 --> <package name="com.qf.mapper"/> </mappers></configuration>8.2 映射文件
在指定的目录下创建映射文件,配置要执行的statement,即增删改查等语句。
xxxxxxxxxx <!-- namespace:配置名称空间,对配置的statement进行分类管理 此时名称可以任意 当使用Mapper代理时,namespace具有特殊的含义与功能 --><mapper namespace="test"> <!-- 根据id查询用户,User findById(int id) select:配置查询语句 id:可以通过id找到执行的statement,statement唯一标识 parameterType:输入参数类型 resultType:输出结果类型 #{}:相当于占位符 #{id}:其中的id可以表示输入参数的名称,如果是简单类型名称可以任意 --> <select id="findById" parameterType="int" resultType="com.qf.domain.User" > select * from user where id=#{id} </select> <!-- 根据用户名称来模糊查询用户信息列表; ${}:表示拼接sql语句 ${value}:表示输入参数的名称,如果参数是简单类型,参数名称必须是value --> <select id="findByUsername" parameterType="java.lang.String" resultType="com.qf.domain.User"> select * from user where username like '%${value}%' </select> <!-- 3、添加用户 #{username}:名称与类中的属性名一致 --> <insert id="addUser" parameterType="com.qf.domain.User"> <!-- selectKey:查询主键 keyProperty:主键对应的属性名称 resultType:结果类型,主键的类型 order:在插入记录的之前或之后查询主键的值 select last_insert_id() mysql提供 的函数,与insert语句搭配使用,查询主键 --> <selectKey keyProperty="id" resultType="int" order="AFTER"> select last_insert_id() </selectKey> insert into user(username,sex,birthday,address) values(#{username},#{sex},#{birthday},#{address}) </insert> <!-- 删除用户 --> <delete id="deleteUser" parameterType="int"> delete from user where id=#{id} </delete> <!-- 修改用户 --> <update id="updateUser" parameterType="com.qf.domain.User"> update user set username=#{username},sex=#{sex},birthday=#{birthday},address=#{address} where id= #{id} </update></mapper>二、MyBatis基本应用
1、搭建MyBatis技术环境
1.1、环境准备
- Jdk环境:jdk1.8
- Ide环境:eclipse oxygen
- 数据库环境:MySQL 5.1
- Mybatis:3.4.5
1.2、下载MyBatis
mybaits的代码由github.com管理,下载地址:https://github.com/mybatis/mybatis-3/releases
Mybatis-3.4.5.jar:mybatis的核心包
Mybatis-3.4.5.pdf:mybatis的使用指南
1.3、数据库准备
xxxxxxxxxxCREATE TABLE `items` ( `id` int(11) NOT NULL AUTO_INCREMENT, `name` varchar(32) NOT NULL COMMENT '商品名称', `price` float(10,1) NOT NULL COMMENT '商品定价', `detail` text COMMENT '商品描述', `pic` varchar(64) DEFAULT NULL COMMENT '商品图片', `createtime` datetime NOT NULL COMMENT '生产日期', PRIMARY KEY (`id`)) ENGINE=InnoDB AUTO_INCREMENT=4 DEFAULT CHARSET=utf8;CREATE TABLE `orderdetail` ( `id` int(11) NOT NULL AUTO_INCREMENT, `orders_id` int(11) NOT NULL COMMENT '订单id', `items_id` int(11) NOT NULL COMMENT '商品id', `items_num` int(11) DEFAULT NULL COMMENT '商品购买数量', PRIMARY KEY (`id`), KEY `FK_orderdetail_1` (`orders_id`), KEY `FK_orderdetail_2` (`items_id`), CONSTRAINT `FK_orderdetail_1` FOREIGN KEY (`orders_id`) REFERENCES `orders` (`id`) ON DELETE NO ACTION ON UPDATE NO ACTION, CONSTRAINT `FK_orderdetail_2` FOREIGN KEY (`items_id`) REFERENCES `items` (`id`) ON DELETE NO ACTION ON UPDATE NO ACTION) ENGINE=InnoDB AUTO_INCREMENT=5 DEFAULT CHARSET=utf8;CREATE TABLE `orders` ( `id` int(11) NOT NULL AUTO_INCREMENT, `user_id` int(11) NOT NULL COMMENT '下单用户id', `number` varchar(32) NOT NULL COMMENT '订单号', `createtime` datetime NOT NULL COMMENT '创建订单时间', `note` varchar(100) DEFAULT NULL COMMENT '备注', PRIMARY KEY (`id`), KEY `FK_orders_1` (`user_id`), CONSTRAINT `FK_orders_id` FOREIGN KEY (`user_id`) REFERENCES `user` (`id`) ON DELETE NO ACTION ON UPDATE NO ACTION) ENGINE=InnoDB AUTO_INCREMENT=6 DEFAULT CHARSET=utf8;CREATE TABLE `user` ( `id` int(11) NOT NULL AUTO_INCREMENT, `username` varchar(32) NOT NULL COMMENT '用户名称', `birthday` date DEFAULT NULL COMMENT '生日', `sex` char(1) DEFAULT NULL COMMENT '性别', `address` varchar(256) DEFAULT NULL COMMENT '地址', PRIMARY KEY (`id`)) ENGINE=InnoDB AUTO_INCREMENT=27 DEFAULT CHARSET=utf8;1.4、数据准备
xxxxxxxxxxinsert into `items`(`id`,`name`,`price`,`detail`,`pic`,`createtime`) values (1,'台式机',3000.0,'该电脑质量非常好!!!!',NULL,'2015-02-03 13:22:53'),(2,'笔记本',6000.0,'笔记本性能好,质量好!!!!!',NULL,'2015-02-09 13:22:57'),(3,'背包',200.0,'名牌背包,容量大质量好!!!!',NULL,'2015-02-06 13:23:02');insert into `orderdetail`(`id`,`orders_id`,`items_id`,`items_num`) values (1,3,1,1),(2,3,2,3),(3,4,3,4),(4,4,2,3);insert into `orders`(`id`,`user_id`,`number`,`createtime`,`note`) values (3,1,'1000010','2015-02-04 13:22:35',NULL),(4,1,'1000011','2015-02-03 13:22:41',NULL),(5,10,'1000012','2015-02-12 16:13:23',NULL);insert into `user`(`id`,`username`,`birthday`,`sex`,`address`) values (1,'王五',NULL,'2',NULL),(10,'张三','2014-07-10','1','北京市'),(16,'张小明',NULL,'1','河南郑州'),(22,'陈小明',NULL,'1','河南郑州'),(24,'张三丰',NULL,'1','河南郑州'),(25,'陈小明',NULL,'1','河南郑州'),(26,'王五',NULL,NULL,NULL);2、获取SqlSession对象
MyBatis框架中涉及到的几个API
- SqlSessionFactoryBuilder:该对象负责根据MyBatis配置文件SqlMapConfig.xml构建SqlSessionFactory实例
- SqlSessionFactory:每一个MyBatis的应用程序都以一个SqlSessionFactory对象为核心。该对象负责创建SqlSession对象实例。
- SqlSession:该对象包含了所有执行SQL操作的方法,用于执行已映射的SQL语句
xxxxxxxxxx//1、读取配置文件String resource = "SqlMapConfig.xml";InputStream inputStream = Resources.getResourceAsStream(resource);//2、根据配置文件创建SqlSessionFactorySqlSessionFactory sqlSessionFactory = new SqlSessionFactoryBuilder().build(inputStream);//3、SqlSessionFactory创建SqlSessionSqlSession sqlSession = sqlSessionFactory.openSession();3、利用SqlSession实现CRUD操作
3.1、新增操作
在映射文件配置
在插入操作完成之前或之后,可以配置
LAST_INSERT_ID:该函数是mysql的函数,获取自增主键的ID,它必须配合insert语句一起使用
xxxxxxxxxx<!-- 添加用户 --> <!-- selectKey:查询主键,在标签内需要输入查询主键的sql --> <!-- order:指定查询主键的sql和insert语句的执行顺序,相当于insert语句来说 --> <!-- LAST_INSERT_ID:该函数是mysql的函数,获取自增主键的ID,它必须配合insert语句一起使用 --> <insert id="addUser" parameterType="com.qf.po.User”><selectKey keyProperty="id" resultType="int" order="AFTER"> SELECT LAST_INSERT_ID() </selectKey>INSERT INTO USER(username,birthday,sex,address) VALUES(#{username},#{birthday},#{sex},#{address})</insert> 测试代码如下,直接执行配置的statement,可以查看结果。
xxxxxxxxxxSqlSession session = sqlSessionFactory.openSession();session.insert("test.addUser",user);session.commit();3.2、删除操作
在映射文件文件中使用
xxxxxxxxxx<delete id="deleteUser" parameterType="int"> delete from user where id=#{id}</delete> 测试代码如下,直接执行配置的statement,可以查看结果。
xxxxxxxxxxSqlSession session = sqlSessionFactory.openSession();session.delete("test.deleteUser",1);session.commit();3.3、修改操作
在映射文件使用
xxxxxxxxxx<update id="updateUser" parameterType="com.qf.domain.User"> update user set username=#{username},sex=#{sex},birthday=#{birthday},address=#{address} where id= #{id}</update> 测试代码如下,直接执行配置的statement,可以查看结果。
xxxxxxxxxx //构建user参数,没有赋值的属性采取默认值 User user = new User(); user.setId(20); user.setUsername("admin"); user.setAddress("beijing"); // 第一个参数:statement的id,建议:namespace.statementId(确保唯一) // 第二个参数:入参的值,它的类型要和映射文件中对应的statement的入参类型一致 sqlSession.update("test.updateUser", user);3.4、查询操作
在映射文件配置<select>标签执行查询操作。
注意:
{}:相当于占位符
{id}:其中的id可以表示输入参数的名称,如果是简单类型名称可以任意
${}:表示拼接sql语句
${value}:表示输入参数的名称,如果参数是简单类型,参数名称必须是value
xxxxxxxxxx<!-- 根据id查询用户,User findById(int id) select:配置查询语句 id:可以通过id找到执行的statement,statement唯一标识 parameterType:输入参数类型 resultType:输出结果类型 #{}:相当于占位符 #{id}:其中的id可以表示输入参数的名称,如果是简单类型名称可以任意 --> <select id="findById" parameterType="int" resultType="com.qf.domain.User" > select * from user where id=#{id} </select> <!-- 根据用户名称来模糊查询用户信息列表; ${}:表示拼接sql语句 ${value}:表示输入参数的名称,如果参数是简单类型,参数名称必须是value --> <select id="findByUsername" parameterType="java.lang.String" resultType="com.qf.domain.User"> select * from user where username like '%${value}%' </select> 测试代码如下,直接执行配置的statement,可以查看结果。
xxxxxxxxxx public User findById(int id) { // TODO Auto-generated method stub SqlSession session = sqlSessionFactory.openSession(); return session.selectOne("test.findById", id); } public List<User> findByUsername(String username) { // TODO Auto-generated method stub SqlSession session = sqlSessionFactory.openSession(); return session.selectList("test.findByUsername", username); }4、利用MyBatis实现分页查询
4.1、使用map
注意:map的key要和sql中的占位符保持名字一致
mapper:
xxxxxxxxxx<!-- 分页:map传参 --> <select id="selectAuthorByPage" resultMap="authorResultMap"> SELECT * FROM AUTHOR LIMIT #{offset}, #{pagesize} </select>接口:
xxxxxxxxxx/** * 根据分页参数查询 * @param paramList 分页参数 * @return 分页后的用户列表 */ List<Author> selectAuthorByPage(Map<String, Object> paramList);测试:
xxxxxxxxxx public void testSelectAuthorByPage(){ Map<String, Object> map = new HashMap<String, Object>(); map.put("offset", 0); map.put("pagesize", 2); AuthorMapper authorDao = session.getMapper(AuthorMapper.class); List<Author> authorList = authorDao.selectAuthorByPage(map); for (int i = 0; i < authorList.size(); i++) { System.out.println(authorList.get(i)); } }4.2、使用注解
注意:mapper文件中的参数占位符的名字一定要和接口中参数的注解保持一致
mapper:
xxxxxxxxxx<!-- 分页:注解传参 --> <select id="selectAuthorByPage2" resultMap="authorResultMap"> SELECT * FROM AUTHOR LIMIT #{offset}, #{pagesize} </select>接口:
xxxxxxxxxx/** * 根据分页参数查询 * @param offset 偏移量 * @param pagesize 每页条数 * @return 分页后的用户列表 */ List<Author> selectAuthorByPage2( (value="offset")int offset, (value="pagesize")int pagesize );测试:
xxxxxxxxxx public void testSelectAuthorByPage2(){ AuthorMapper authorDao = session.getMapper(AuthorMapper.class); List<Author> authorList = authorDao.selectAuthorByPage2(0, 2); for (int i = 0; i < authorList.size(); i++) { System.out.println(authorList.get(i)); System.out.println("----------------------"); } }4.3、使用序号
注意:mapper文件中参数占位符的位置编号一定要和接口中参数的顺序保持一致
mapper:
xxxxxxxxxx<!-- 分页:序号传参 --> <select id="selectAuthorByPage3" resultMap="authorResultMap"> SELECT * FROM AUTHOR LIMIT #{0}, #{1} </select>接口:
xxxxxxxxxx /** * 根据分页参数查询 * @param offset 偏移量 * @param pagesize 每页条数 * @return 分页后的用户列表 */ List<Author> selectAuthorByPage3(int offset, int pagesize);测试:
xxxxxxxxxx public void testSelectAuthorByPage3(){ AuthorMapper authorDao = session.getMapper(AuthorMapper.class); List<Author> authorList = authorDao.selectAuthorByPage3(1, 1); for (int i = 0; i < authorList.size(); i++) { System.out.println(authorList.get(i)); System.out.println("----------------------"); } }5、返回Map类型查询结果
Mybatis中查询结果集为Map的功能,只需要重写ResultHandler接口,,然后用SqlSession 的select方法,将xml里面的映射文件的返回值配置成 HashMap 就可以了。具体过程如下
5.1、xml文件配置
xxxxxxxxxx<resultMap id="getAllSetDaysResult" type="HashMap"> <result property="key" column="SP_FPARAMEKEY" /> <result property="value" column="SP_FPARAMEVALUE" /> </resultMap> 5.2、sql的编写
xxxxxxxxxx<select id="getAllSetDays" resultMap="getAllSetDaysResult"> SELECT SP.FPARAMEKEY SP_FPARAMEKEY, SP.FPARAMEVALUE SP_FPARAMEVALUE FROM T_SERVER_PARAMETER SP WHERE SP.FPARAMEKEY IN ('XXX') </select> 这里面的property属性列的值,就是你后面实现的
ResultHandler 接口返回的map集的key和value,具体看代码
5.3、实现org.apache.ibatis.session 中ResultHandler接口
xxxxxxxxxxpublic class FblMapResultHandler implements ResultHandler { ("rawtypes") private final Map mappedResults = new HashMap(); ("unchecked") public void handleResult(ResultContext context) { ("rawtypes") Map map = (Map) context.getResultObject(); mappedResults.put(map.get("key"), map.get("value")); // xml 配置里面的property的值,对应的列 } public Map getMappedResults() { return mappedResults; } }3、调用select方法:
xxxxxxxxxxFblMapResultHandler fbl = new FblMapResultHandler(); getSqlSession().select(NAMESPACE +"getAllSetDays",fbl); ("rawtypes") Map map =fbl.getMappedResults(); return map; 此时map里面的key,和value就是我们数据库中表中的对应的两列了.
6、使用Mapper映射器
Mapper代理的开发方式,程序员只需要编写mapper接口(相当于dao接口)即可。Mybatis会自动的为mapper接口生成动态代理实现类。
不过要实现mapper代理的开发方式,需要遵循一些开发规范。
6.1、开发规范
- mapper接口的全限定名要和mapper映射文件的namespace的值相同。
- mapper接口的方法名称要和mapper映射文件中的statement的id相同;
- mapper接口的方法参数只能有一个,且类型要和mapper映射文件中statement的parameterType的值保持一致。
- mapper接口的返回值类型要和mapper映射文件中statement的resultType值或resultMap中的type值保持一致;
通过规范式的开发mapper接口,可以解决原始dao开发当中存在的问题:
- 模板代码已经去掉;
- 剩下去不掉的操作数据库的代码,其实就是一行代码。这行代码中硬编码的部分,通过第一和第二个规范就可以解决。
6.2、编程步骤
- 根据需求创建po类
- 编写全局配置文件
- 根据需求编写映射文件
- 加载映射文件
- 编写mapper接口
- 编写测试代码
6.3、程序编写
步骤中的1、2都在入门程序中进行了编写,此处不需要重新编写。
a编写mapper映射文件
重新定义mapper映射文件UserMapper.xml(内容同Users.xml,除了namespace的值),放到新创建的目录mapper下。
xxxxxxxxxx <!-- namespace:此时用mapper代理方式,它的值必须等于对应mapper接口的全限定名 --><mapper namespace="com.qf.mybatis.mapper.UserMapper"> <!-- 根据用户ID,查询用户信息 --> <!-- [id]:statement的id,要求在命名空间内唯一 [parameterType]:入参的java类型,可是是简单类型、POJO、HashMap [resultType]:查询出的单条结果集对应的java类型 [#{}]: 表示一个占位符? [#{id}]:表示该占位符待接收参数的名称为id。注意:如果参数为简单类型时,#{}里面的参数名称可以是任意定--> <select id="findUserById" parameterType="int" resultType="com.qf.mybatis.po.User"> SELECT * FROM USER WHERE id = #{id} </select> <!-- 根据用户名称模糊查询用户信息列表 --> <!-- [${}]:表示拼接SQL字符串,即不加解释的原样输出 [${value}]:表示要拼接的是简单类型参数。 注意: 1、如果参数为简单类型时,${}里面的参数名称必须为value 2、${}会引起SQL注入,一般情况下不推荐使用。但是有些场景必须使用${},比如order by ${colname} --> <select id="findUsersByName" parameterType="java.lang.String" resultType="com.qf.mybatis.po.User"> SELECT * FROM USER WHERE username LIKE '%${value}%' </select> <!-- 添加用户之自增主键返回(selectKey方式) --> <!-- [selectKey标签]:通过select查询来生成主键 [keyProperty]:指定存放生成主键的属性 [resultType]:生成主键所对应的Java类型 [order]:指定该查询主键SQL语句的执行顺序,相对于insert语句,此时选用AFTER [last_insert_id]:MySQL的函数,要配合insert语句一起使用 --> <insert id="insertUser" parameterType="com.qf.mybatis.po.User"> <selectKey keyProperty="id" resultType="int" order="AFTER"> SELECT LAST_INSERT_ID() </selectKey> INSERT INTO USER(username,sex,birthday,address) VALUES (#{username},#{sex},#{birthday},#{address}) </insert></mapper>b加载mapper映射文件
xxxxxxxxxx<!-- 加载mapper --><mappers> <mapper resource="sqlmap/User.xml"/> <mapper resource="mapper/UserMapper.xml"/></mappers>c编写mapper接口
内容同UserDao接口一样:
xxxxxxxxxxpublic interface UserMapper { //根据用户ID来查询用户信息 public User findUserById(int id); //根据用户名称来模糊查询用户信息列表 public List<User> findUsersByName(String username); //添加用户 public void insertUser(User user);}d编写测试代码
xxxxxxxxxxpublic class UserMapperTest {// 声明全局的SqlSessionFactory private SqlSessionFactory sqlSessionFactory; public void setUp() throws Exception { // 1、读取配置文件 String resource = "SqlMapConfig.xml"; InputStream inputStream = Resources.getResourceAsStream(resource); // 2、根据配置文件创建SqlSessionFactory sqlSessionFactory = newSqlSessionFactoryBuilder().build(inputStream); } public void testFindUserById() { // 创建SqlSession SqlSession sqlSession = sqlSessionFactory.openSession(); // 通过SqlSession,获取mapper接口的动态代理对象 UserMapper userMapper = sqlSession.getMapper(UserMapper.class); // 调用mapper对象的方法 User user = userMapper.findUserById(1); System.out.println(user); // 关闭SqlSession sqlSession.close(); } public void testFindUsersByName() { // 创建SqlSession SqlSession sqlSession = sqlSessionFactory.openSession(); // 通过SqlSession,获取mapper接口的动态代理对象 UserMapper userMapper = sqlSession.getMapper(UserMapper.class); // 调用mapper对象的方法 List<User> list = userMapper.findUsersByName("小明"); System.out.println(list); // 关闭SqlSession sqlSession.close(); } public void testInsertUser() { // 创建SqlSession SqlSession sqlSession = sqlSessionFactory.openSession(); // 通过SqlSession,获取mapper接口的动态代理对象 UserMapper userMapper = sqlSession.getMapper(UserMapper.class); //构造User对象 User user = new User(); user.setUsername("tom"); user.setAddress("北京"); // 调用mapper对象的方法 userMapper.insertUser(user); System.out.println(user.getId()); //执行SqlSession的commit操作 sqlSession.commit(); // 关闭SqlSession sqlSession.close(); }}
7、ResultMap映射定义
resultMap可以进行高级结果映射。
7.1、使用方法
如果查询出来的列名和属性名不一致,通过定义一个resultMap将列名和pojo属性名之间作一个映射关系。
- 定义resultMap
- 使用resultMap作为statement的输出映射类型。
7.2、需求
把下面SQL的输出结果集进行映射
SELECT id id,username username,sex sex_ FROM USER WHERE id = 1
7.3、Mapper映射文件
xxxxxxxxxx<!-- 定义resultMap --><!-- [id]:定义resultMap的唯一标识 [type]:定义该resultMap最终映射的pojo对象 [id标签]:映射结果集的唯一标识列,如果是多个字段联合唯一,则定义多个id标签 [result标签]:映射结果集的普通列 [column]:SQL查询的列名,如果列有别名,则该处填写别名 [property]:pojo对象的属性名--><resultMap type="user" id=“userResultMap”> <id column="id_" property="id"/> <result column="username_" property="username"/> <result column="sex_" property="sex"/></resultMap> <!-- 根据ID查询用户信息(学习resultMap) --><select id="findUserByIdResultMap" parameterType="int" resultMap="userResultMap"> SELECT id id,username username,sex sex_ FROM USER WHERE id = #{id}</select>
7.4、Mapper接口定义
xxxxxxxxxx //根据ID查询用户信息(学习resultMap) public User findUserByIdResultMap(int id);定义Statement使用resultMap映射结果集时,Mapper接口定义方法的返回值类型为mapper映射文件中resultMap的type类型。
7.5、测试代码
xxxxxxxxxxpublic void findUserByIdResultMapTest() { // 创建SqlSession SqlSession sqlSession = sqlSessionFactory.openSession(); // 通过SqlSession,获取mapper接口的动态代理对象 UserMapper userMapper = sqlSession.getMapper(UserMapper.class); // 调用mapper对象的方法 User user = userMapper.findUserByIdResultMap(1); System.out.println(user); // 关闭SqlSession sqlSession.close();}课前默写
1. SpringMVC中异常处理
2. SpringMVC中拦截器
3. SpringMVC中的文件上传下载
作业
1. 使用Hibernate作业第四天数据库(myschool)
2. 使用单元测试的方式并使用MyBatis框架完成学生表单表的CRUD操作
面试题
1. 掌握MyBatis框架原理
2. 掌握MyBatis的基本数据交互方式
3. 掌握MyBatis基础配置
4. 掌握MyBatis环境搭建
5. 掌握MyBatis的基础CRUD操作